Spring AI with Ollama
- Ankit Agrahari
- May 3, 2025
- 4 min read


Objective
As part of this blog post, we will be creating a simple Rest API using Spring AI to send and receive responses from Ollama on your local machine.
Why Ollama:
-- Ollama is an open-source tool enabling you to run LLMs such as deepseek, llama, mistral, chatgpt, and others on your local machine. This ensures that your data remains within your home network.
-- The best part? There's no need to generate multiple API keys and no limit.
Installing & Running Ollama
The Ollama includes an executable that can be obtained from https://ollama.com/download
Once downloaded, simply double-click to install it, and within a minute, it will be ready to execute commands on your local machine. You can then download and run various versions of models, enabling you to test all the latest updates available. Keep in mind that this will require more storage space.
You can also use docker to run Ollama. https://ollama.com/blog/ollama-is-now-available-as-an-official-docker-image. The mac users need to check if they want to run standalone or viai docker desktop, as Docker Desktop doesn't support GPU.
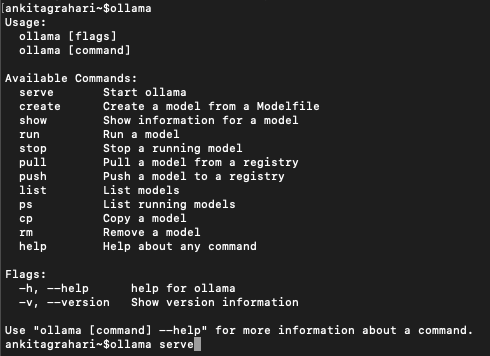
On the Ollama terminal, you can use /? command or just write ollama to get the list of commands that can be executed.
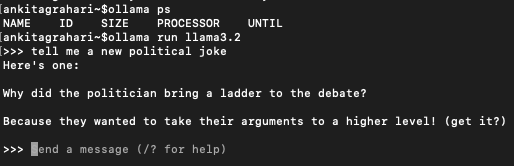
To run our project, we need the ollama server running. You can either run any model of your choice. I am running the llama 3 (while writing this, llama3.3 is also available)
ollama run llama3.2This will run the server where you can send any queries based on the prompt provided.
URL to connect to your Ollama server running on your local is http://localhost:11434/api/generate
Project Setup
We will navigate to spring intializer to setup the project and add the required dependencies. It should look like this
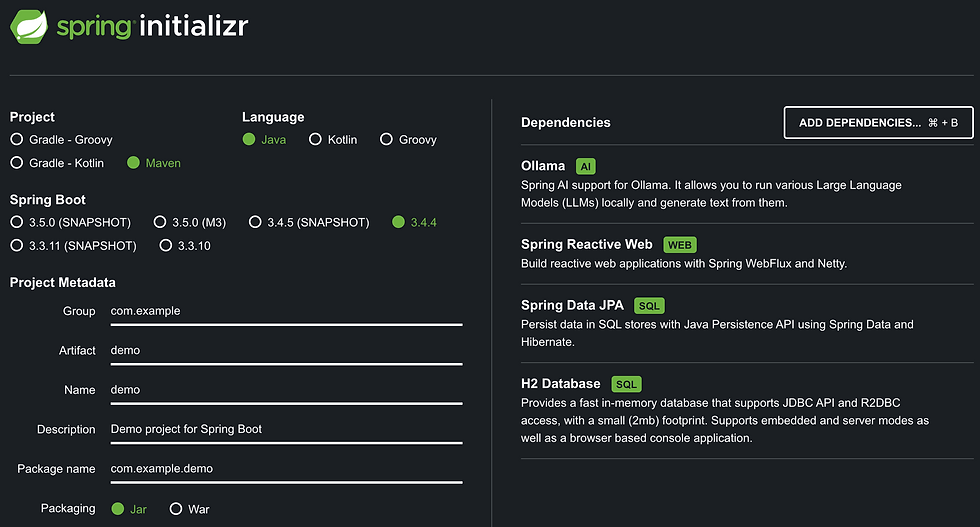
Notice the Ollama dependency added.
Lets now look into the application.properties file where you will define the Ollama specific parameters for your project to access the Ollama server and talk to it.
spring.ai.ollama.base-url=http://localhost:11434It defines the url where the local server is hosted.
spring.ai.ollama.chat.options.model=llama3.2It defines the model that shoulld be used.
spring.ai.ollama.init.pull-model=when-missingSpring AI allows you to download the model as mentioned in this parameter. The possible values are
always: It will always download the model, even if it is present. This ensures that you are working with the latest version of model
when_missing: It will download the model when it is not present.
never: It will never download the model, unless and until it is explicitly done.
There are a bunch of parameters which can be configured before running the application. You can find the details here Chat Properties
Here is the sample of the application properties I used

Lets now create a controller where we can define the API details to connect to ollama.
Just before jumping to the controller, lets look into how the LLM model will understand what the user is asking. In order to do so, there are Prompt generated by user, which specifically tells the model about the details like what is expected as response, what could be the size of the response, what should be the main details in the response, etc.
And Spring AI provides the ChatClient which offers a fluent API to communicate with AI models. It supports both asynchronous and synchronous programming model. It constructs the required part of the Prompt which is then fed to AI model.
Now lets move to creating the Rest Controller, where we default ChatClient will be created which will process the user input to the AI model, and retrieve the response as per the request.
@RestController
public class ClientController {

    private final ChatClient client;

	private static final String MESSAGE_FORMAT = """
            {
              "model": "llama3.2",
              "messages": [{\s
                "role": "user",\s
                "content": "$message$"\s
                }
              ]
            }
           \s""";

    public ClientController(ChatClient.Builder builder) {
        this.client = builder.build();
    }

    @GetMapping("/ai/{message}")
    Flux<ChatResponse> generateResponse(@PathVariable(value = "message") String userInput){
        userInput = MESSAGE_FORMAT.replace("$message$", userInput);
        return this.client.prompt(userInput)
                .stream()
                .content();
    }
}
To create the default ChatClient, we can use the builder. But if you want to create with a specific requirement, then you can refer to this Spring AI documentation.
One thing to notice here is, we are using reactive web project and thats why the ChatClient is called with stream() rather than call() method.
And you are all set to start your first Spring AI project which will connect to the Ollama server running locally.
While starting the spring application, if the pull-model parameter is given as always, you will see that it will start downloading the specific model. This may take a lot of time depending on the size of the model and your internet speed. It is advisable if your are running locally to go with when_missing option instead of always.
The response to the API will load the response character by character as the streams of string is loaded.
This is just the basic to get the response from the Ollama server running locally. There are a bunch of updates which will comes on top of this in coming days. The way we are getting the input can also be improved. This is the github link for this project Spring AI with Ollama.
This post is after a long time, and I hope it will help you learning Spring AI.


Comments